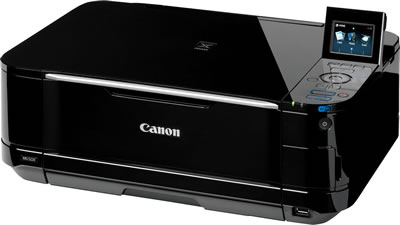
I own a Canon Pixima MG5220. It’s a decent all in one printer. I bought it from Fry’s, on sale and have been paying through the nose ever since for ink. Last year I tried some off brand ink from Fry’s. It was okay. Then this year I stated buying Office Depot’s brand ink. Office Depot’s ink is a genuine Canon cartridge that has been refilled. They are pretty good. I get good print quality and decent output from them. The price is good.
So my printer isn’t anything I would laud, but it is paid for so a few weeks when it started giving me troubles I wasn’t happy. The print quality was so bad that ‘C’ looked like a lego ‘8’ and no line was readable.
I went through all the normal maintenance checks –
- Clean – as many as 10 times!
- Automatic print head alignment – this had a 50% fail rate!
- Deep clean – too many times! I went through two tanks of the 225 PGBK ink!
- Manual Printhead alignment – all the blocks of test colors looked exactly the same – horizontal and vertical stripes everywhere.
By the end of it the page was smeared in a lovely rainbow like prism of color. Googling told me that the print head might be damaged or the motor or the carriage or the –
Google didn’t really know what was wrong with the machine. But I reasoned that since I could not align the printheads, the print head was the culprit.
A new printhead, IF I could find one was $90. At least. That was more than I paid for the printer. I could get another printer for that price.
I was truly upset. I did not want to buy another printer. And I didn’t want to shell out $$$ for a printhead which may or may not be broken.
I was just about to give up when I stumbled onto this YouTube video. (Thank you, God! No really! Thank you Lord. This was a minor miracle. I have lots of other stresses! I didn’t need this one! )
What did I have to lose I thought. If I broke the thing more, it was, as far as I was concerned, already trashed. I wasn’t going to pay to have it repaired! Besides, I’d learn something (and possibly make a mess 😀 ) I was game to try it.
On with the circus!!
(This is not a technical article. I’m just sharing what I did. )
Materials
- One dirty printhead
- Warm water (or room temperature). Do not use tap water because it may contain sediment. Distilled water is best. I used Costco drinking water.
- Some sort of pipette, straw or small spoon.
- At least one container that you don’t mind getting stained with the ink. I used two containers – a gelato container (YUM!!) and a Hillshire farm smoked turkey container.
- Soft cloth or tissue. I used an old cloth diaper. I was leery of the tissue because of fuzz/lint. I suspect eyeglasses cleaning cloth would be good too.
Step one:
Turn on the machine and open the cover to see the ink tanks. The carriage assembly will slide into center and stop.
The carriage assembly is the carriage that slides on the bar, a locking arm that keeps the prinhead locked into the assembly, the ink tanks and the printheads.
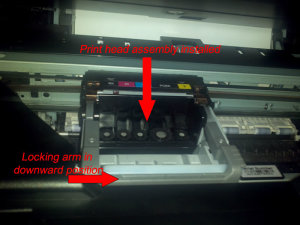
Step two:
Pull the electrical cord from the power source. This will allow the carriage assembly to remain in the center position.
Step three:
Remove all the inks and then raise the locking arm.
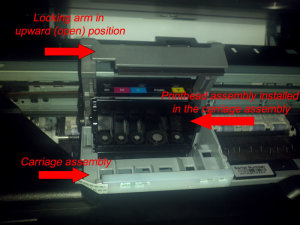
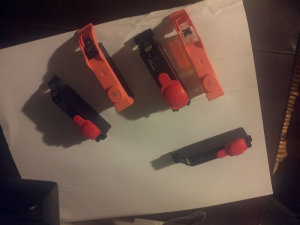
This process can take a long time depending on how dirty your printheads are. So take some precautions to prevent the ink tanks from drying. I put the caps back on my ink tanks to prevent them from drying out.
Like so:
Step four:
Remove the printhead. In my machine it is the black structure. The carriage itself is white/grey. Be VERY VERY careful!!! You can damage the brown contact area on the bottom OR the green and gold circuit board on the front face!!
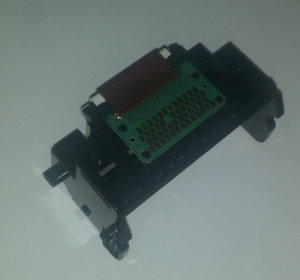
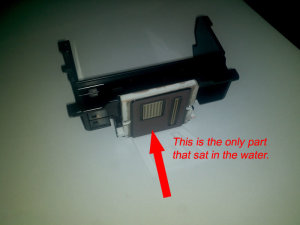
When I removed my printhead the brown area was cover in a layer of thick, almost plastic like ink. The structures that look like nail heads that you see in following images, were ‘painted’ in their respective ink colors. The spillage was very bad and the ink had harden.
Step five:
Soak the print heads in water
*CAUTION* DO NOT GET THE CIRCUIT BOARD WET! *CAUTION*
I placed the printhead assembly in enough water to just cover the brown part. I used a plastic drinking straw to pipette water into the assembly where the ‘nail head’ like structures are. (I am sure there is a technical term for those. If you know please leave it in the comments. Thanks.)
It is important NOT TO SCRATCH the brown surface, so do not drag it across the bottom of the container you are using. Swish it gently in the water. The ink will eventually wash away.
*CAUTION* DO NOT GET THE CIRCUIT BOARD WET! *CAUTION*
Step six:
Change the water until it is clear. It took many changes. The water was at first very black, then an odd blue black, then a dark pink black before it was clear. I changed the water as often as I thought it needed. I would come by and put new water on the nail heads frequently as this water would over flow.
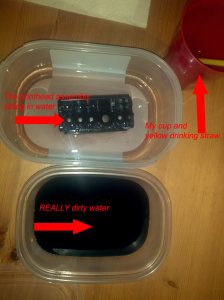
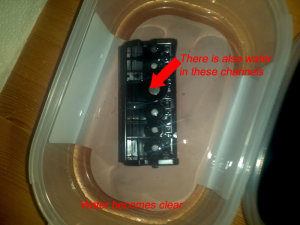
*CAUTION* DO NOT GET THE CIRCUIT BOARD WET! *CAUTION*
Step seven:
Dry the printheads by gently patting with a soft cloth.
DO NOT RUB or SCRATCH!!!
He used tissue paper. I used an old cloth diaper. I set the assembly in front of a fan with the nail heads towards the air flow. This helped to dry it. I did have to shake out some excess water that got trapped in the little areas of the assembly.
Make sure it is completely dry before loading it into the carriage.
Step eight:
Load in the printhead into the carriage and close the arm. Then load all the inks.
Step nine:
Run the automatic printhead alignment. I did this using the control panel on the printer itself. But you can do it from the Printer area in Windoze.
Step ten:
Thank God because you just save $90.
All in all this whole thing took almost 24 hours. I took my time.
For those of us with little kids – this is not a project to do with, near, by or on little people! Little people include cats and dogs and hamsters in their rolly balls! It cannot be stressed enough that you should NOT get the little circuit board wet.
Hope this helps someone!
Chere
P.S. Deep Cleaning Cycles should only be run TWO TIMES. Period. Every cleaning cycle deposits a considerable amount of ink, further clogging the heads. If after the second cycle your print quality is still poor, you need to do this manual cleaning!

I had a good laugh on your descriptions on printheads. I brought my Canon Pixma MG5220 in the year 2011. Today, I have an error message on the printheads. I wanted to know where they are and what to do. Your article, besides funny, it was helpful. You know what? I decided to buy new printheads. lol. THANKS!
Can you program a Canon MG 5320 to print 30 inches instead of 26.61 that is the maximum under custom paper settings?
Actually, I have no idea. 🙂 Sorry.
Hi, I was confused because I could see the circuit board in your earlier photos but when the print head was sitting in the water, I could not see the circuit board at all as if the circuit board was on the underside and was under water. ? If you could explain this I would greatly appreciate it. Thanks for the post.
Thanks for this Nice Article.
Canon printers are one of best printers and the most renowned brand in printer’s reality. These printers are outstanding for its easy to understand innovation and quality print.
Took it apart, did what you said, put it together. IT WORKS!
Thanks, Genesis! 👍😁
AWESOMENESS!!!!
Thanks for the feedback!!
Hey all, i have a Canon Pixma MP540 Printer without a B200 Error, how can fix it ?
Good day I am so glad I found your web site, I really found you by mistake, while I was looking on Aol for something else, Regardless I am here now and would just like to say thank you for a fantastic post and a all round enjoyable blog (I also love the theme/design), I don’t have time to browse it all at the moment but I have book-marked it and also added your RSS feeds, so when I have time I will be back to read a great deal more, Please do keep up the awesome work.
Hii
Sometimes, you may run into problems using the printer when printing your images and documents. All of these challenges can be resolved by getting the help of technical experts.
You lost me, friend. I mean, I suppose I get what youre indicating. I realize what you are saying, but you just seem to have overlooked that there are some other individuals inside the world who look at this matter for what it definitely is and might not agree with you. You may be turning away a lot of folks who may have been supporters of your web site.
For some cause the picture just isn’t loading appropriately, is at this time there an issue?
No I haven’t had any technical issues like you state here. Thanks!
Spot up for this write-up, I seriously believe this site needs a lot more consideration. I’ll apt to be once more to learn additional, appreciate your that info.