About 15 years ago I had an unfortunate gig working with a company developing ebay templates. It was TERRIBLE.
Custom Ebay Templates
These templates offended everything about web development 15 years ago. Which is really saying something, since 15 years ago web development had been wrestled (beaten to a pulp) from the arms of geek programmers and given to designers who didn’t know how to design for the screen. (NEVER let a print designer design your digital assets.)
I remember cringing and groaning at the hideousness – the heights of ugly that they achieved. No. Not the visual design – though that was suspect – the underlying code.
Nested tables. Nested tables with spacer images holding the shape together. Abominations!!
It was all Internet Explorer’s fault of course. (Of course! !)
With this little bit of history, you can imagine how thrilled I was when my PM skyped that apparently flattering sentence to me.
I like the PM. Liked the project we were on. Did NOT at all care to have anything to do with Ebay. I don’t even use Ebay – not a seller, not a buyer, not a browser.
But he seemed confident and here I was looking for hours. So off I went.
TWO days later I finally find the template codes needed. Google almost failed me. Ebay does not make these things easily findable and I FOUND out why:
Quote from an Ebay rep :
The new Store design allows you to set the following:
Billboard image
Logo
Store name
Store description
Featured listings module
Default order in which items are displayed
Default view of Gallery or List
Even with the new design, the custom Store categories, search engine keywords, and listing frame features are the same.
There are no options to have:
A different layout (such as 3 columns)
Different colors or fonts (except within the Billboard and Logo images)
Promotional boxes other than the Featured listings module
So Ebay is changing how it is displaying sellers’ pages, products etc.
The new page design is nice – bland and serviceable – already dated as far as design goes. But, and this might sound hypocritical, I actually like them. But (again) all the ‘branding’ you would normally have will (soon?) be taken away. OR at least discouraged. Your Ebay store will look like every other Ebay store for the most part… Or so it seems.
I don’t know.
What I do know is how to use the Ebay interface to create a real three column layout for pages.
Yipeeeee!!
I wish I could show the site – it’s actually not finished. The PM and the OM are rejiggering and jousting. I have no idea what that will mean for the project. But for me I have a new skill!
I can develop Custom Ebay templates. From Scratch. Code them out. Install them. And fix them!
As a part of ‘How I Unwind’ I spent twenty minutes on Pinterest looking through various ‘funny boards’. This one had me LOL and rolling and tears. ‘Cause (cute + rage comic + over stimulated brain )=== HILARIATY!
I own a Canon Pixima MG5220. It’s a decent all in one printer. I bought it from Fry’s, on sale and have been paying through the nose ever since for ink. Last year I tried some off brand ink from Fry’s. It was okay. Then this year I stated buying Office Depot’s brand ink. Office Depot’s ink is a genuine Canon cartridge that has been refilled. They are pretty good. I get good print quality and decent output from them. The price is good.
So my printer isn’t anything I would laud, but it is paid for so a few weeks when it started giving me troubles I wasn’t happy. The print quality was so bad that ‘C’ looked like a lego ‘8’ and no line was readable.
I went through all the normal maintenance checks –
Clean – as many as 10 times!
Automatic print head alignment – this had a 50% fail rate!
Deep clean – too many times! I went through two tanks of the 225 PGBK ink!
Manual Printhead alignment – all the blocks of test colors looked exactly the same – horizontal and vertical stripes everywhere.
By the end of it the page was smeared in a lovely rainbow like prism of color. Googling told me that the print head might be damaged or the motor or the carriage or the –
Google didn’t really know what was wrong with the machine. But I reasoned that since I could not align the printheads, the print head was the culprit.
A new printhead, IF I could find one was $90. At least. That was more than I paid for the printer. I could get another printer for that price.
I was truly upset. I did not want to buy another printer. And I didn’t want to shell out $$$ for a printhead which may or may not be broken.
I was just about to give up when I stumbled onto this YouTube video. (Thank you, God! No really! Thank you Lord. This was a minor miracle. I have lots of other stresses! I didn’t need this one! )
What did I have to lose I thought. If I broke the thing more, it was, as far as I was concerned, already trashed. I wasn’t going to pay to have it repaired! Besides, I’d learn something (and possibly make a mess 😀 ) I was game to try it.
On with the circus!!
(This is not a technical article. I’m just sharing what I did. )
Materials
One dirty printhead
Warm water (or room temperature). Do not use tap water because it may contain sediment. Distilled water is best. I used Costco drinking water.
Some sort of pipette, straw or small spoon.
At least one container that you don’t mind getting stained with the ink. I used two containers – a gelato container (YUM!!) and a Hillshire farm smoked turkey container.
Soft cloth or tissue. I used an old cloth diaper. I was leery of the tissue because of fuzz/lint. I suspect eyeglasses cleaning cloth would be good too.
Step one:
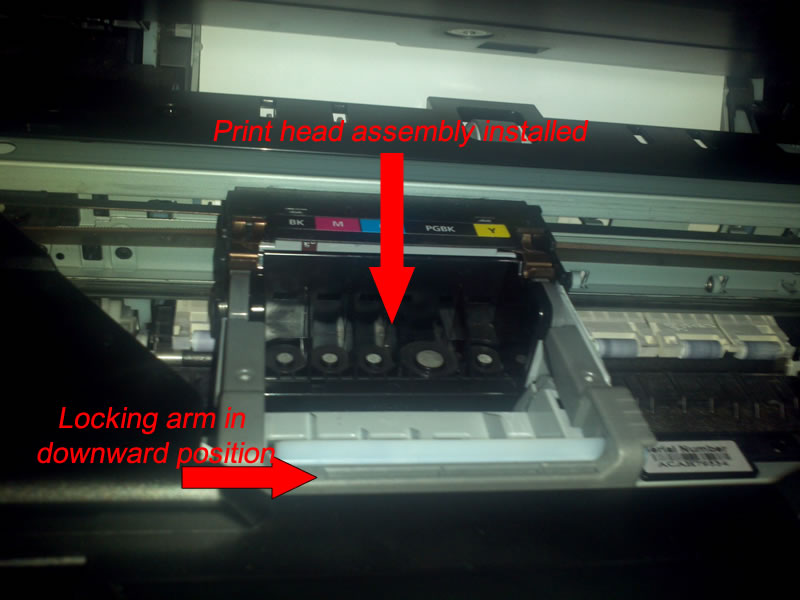
Turn on the machine and open the cover to see the ink tanks. The carriage assembly will slide into center and stop.
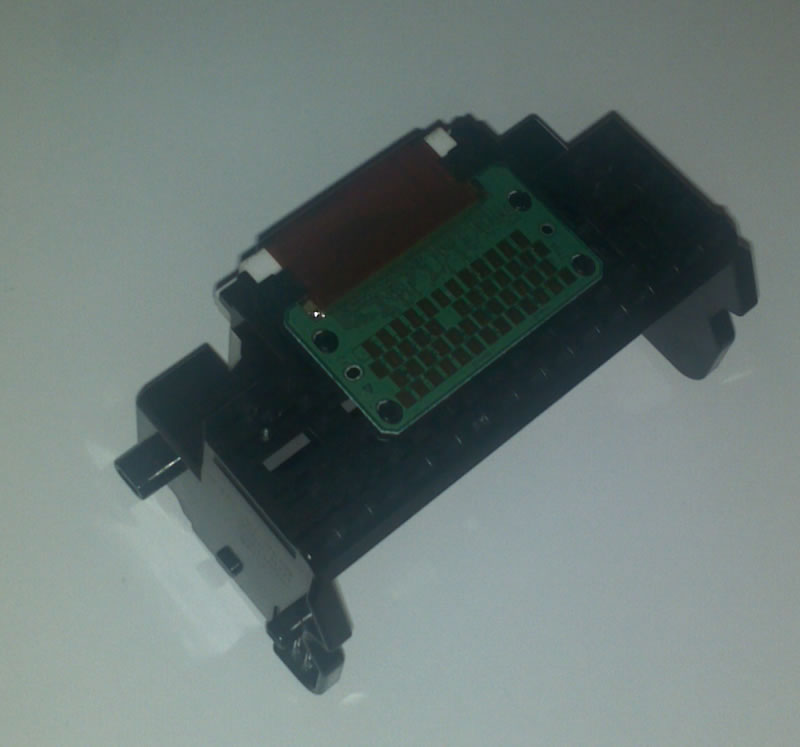
The carriage assembly is the carriage that slides on the bar, a locking arm that keeps the prinhead locked into the assembly, the ink tanks and the printheads.
My printhead in the carriage with the arm locked. Ink tanks removed.
Step two:
Pull the electrical cord from the power source. This will allow the carriage assembly to remain in the center position.
Step three:
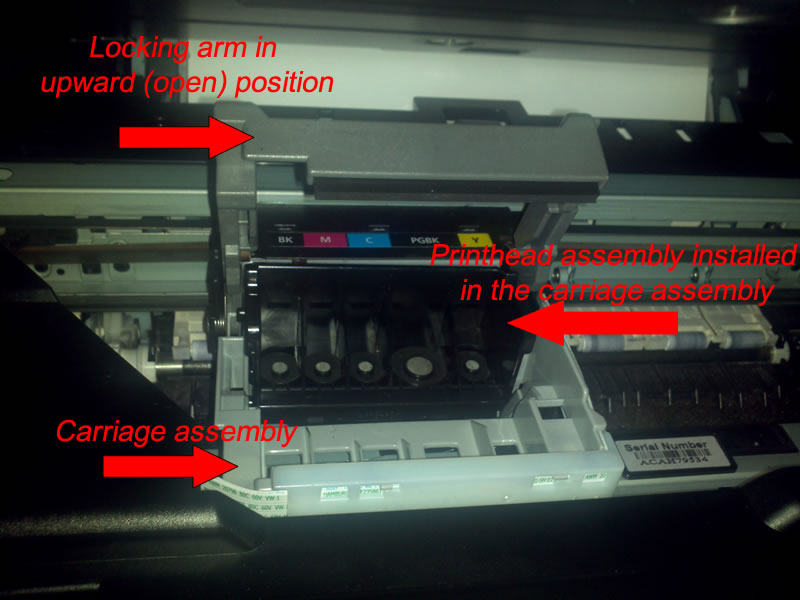
Remove all the inks and then raise the locking arm.
Printhead in carriage assembly with locking arm raised.
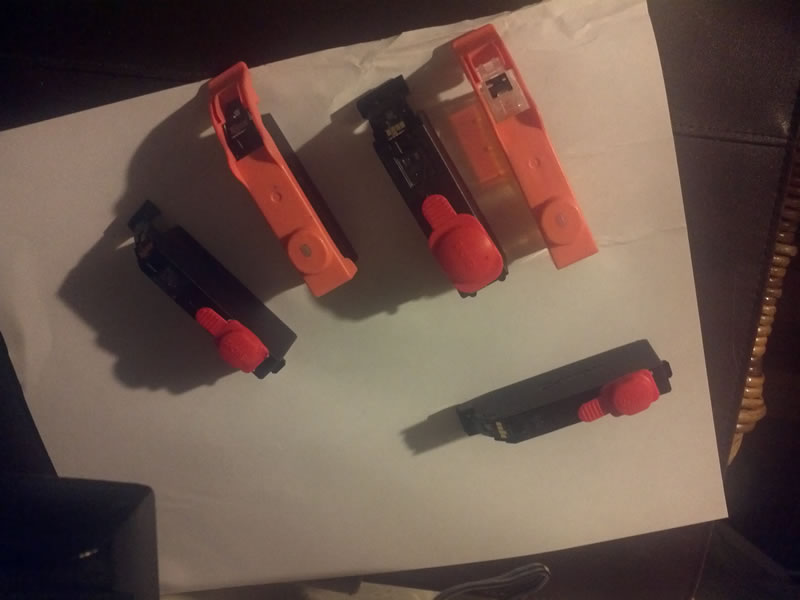
This process can take a long time depending on how dirty your printheads are. So take some precautions to prevent the ink tanks from drying. I put the caps back on my ink tanks to prevent them from drying out.
Like so:
Ink tanks with tightly sealed caps
Step four:
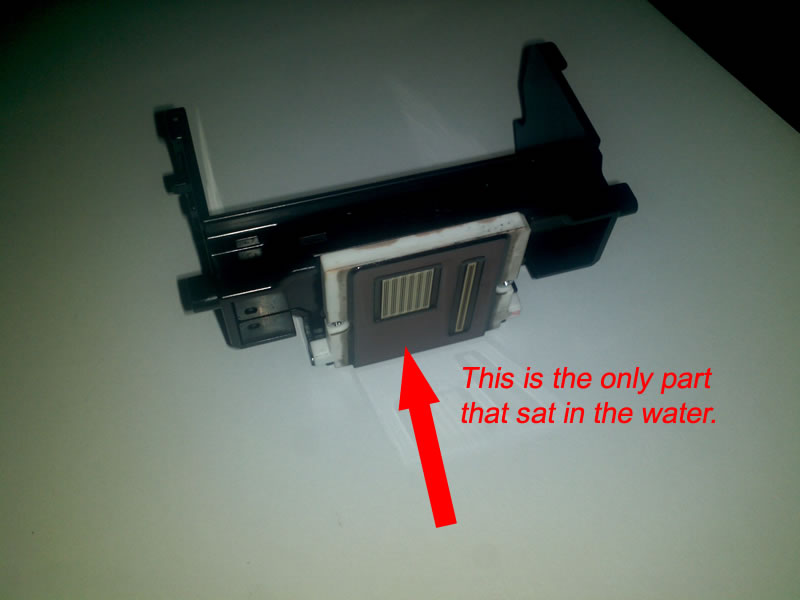
Remove the printhead. In my machine it is the black structure. The carriage itself is white/grey. Be VERY VERY careful!!! You can damage the brown contact area on the bottom OR the green and gold circuit board on the front face!!
Printhead circuit board. DO NOT WET!Brown contact area of the printhead. This is the only part that should sit in the water.
When I removed my printhead the brown area was cover in a layer of thick, almost plastic like ink. The structures that look like nail heads that you see in following images, were ‘painted’ in their respective ink colors. The spillage was very bad and the ink had harden.
Step five:
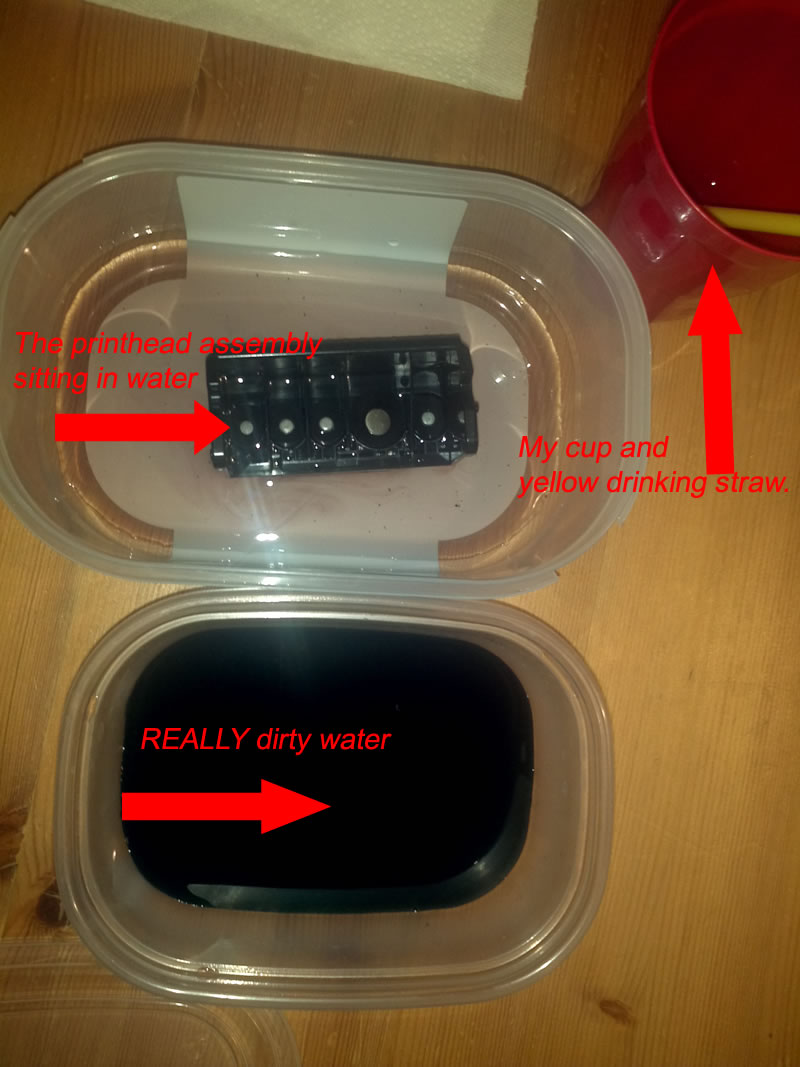
Soak the print heads in water
*CAUTION* DO NOT GET THE CIRCUIT BOARD WET! *CAUTION*
I placed the printhead assembly in enough water to just cover the brown part. I used a plastic drinking straw to pipette water into the assembly where the ‘nail head’ like structures are. (I am sure there is a technical term for those. If you know please leave it in the comments. Thanks.)
It is important NOT TO SCRATCH the brown surface, so do not drag it across the bottom of the container you are using. Swish it gently in the water. The ink will eventually wash away.
*CAUTION* DO NOT GET THE CIRCUIT BOARD WET! *CAUTION*
Step six:
Change the water until it is clear. It took many changes. The water was at first very black, then an odd blue black, then a dark pink black before it was clear. I changed the water as often as I thought it needed. I would come by and put new water on the nail heads frequently as this water would over flow.
Printhead in almost clean water. Old water next to itPrinthead with water in the channels where the ‘nail head’ structures are
*CAUTION* DO NOT GET THE CIRCUIT BOARD WET! *CAUTION*
Step seven:
Dry the printheads by gently patting with a soft cloth.
DO NOT RUB or SCRATCH!!!
He used tissue paper. I used an old cloth diaper. I set the assembly in front of a fan with the nail heads towards the air flow. This helped to dry it. I did have to shake out some excess water that got trapped in the little areas of the assembly.
Make sure it is completely dry before loading it into the carriage.
Step eight:
Load in the printhead into the carriage and close the arm. Then load all the inks.
Step nine:
Run the automatic printhead alignment. I did this using the control panel on the printer itself. But you can do it from the Printer area in Windoze.
Step ten:
Thank God because you just save $90.
All in all this whole thing took almost 24 hours. I took my time.
For those of us with little kids – this is not a project to do with, near, by or on little people! Little people include cats and dogs and hamsters in their rolly balls! It cannot be stressed enough that you should NOT get the little circuit board wet.
Hope this helps someone!
Chere
P.S. Deep Cleaning Cycles should only be run TWO TIMES. Period. Every cleaning cycle deposits a considerable amount of ink, further clogging the heads. If after the second cycle your print quality is still poor, you need to do this manual cleaning!
A couple of weeks ago I took on a new client (a large company) that was NOT using WORDPRESS. Yay me!! Finally some challenging work.
It’s a large store running under Magento. Magento is a massive, beastly ecommerce solution. Very powerful and highly scalable it can be used to run a gigantic online concern that interacts in highly specific and unique ways with its clients and its products.
Magento Logo
Beastly is an apt description. This is supposed to be an MVC based programming. It’s done POORLY.
But that’s not the new skill set I am gaining. Magento reminds me of old Zen Cart. And Open Cart. Only not as well done. What I started learning is COMMAND LINE interaction with the server file system.
This was a stretch for me. A real stretch. I am using putty and pcsp. I tried nano and grep…
Fail.
I was actually feeling ‘stoooooopid‘. This is somewhat like old DOS, which I was pretty good at back in the day. I still remember quite a few commands. But for some reason, my eyes crossed, my brain started singing the Manamana song… It was bad.
So I did what I would do with my kids – remediation. I went back to look at old DOS. Then I stumbled on to Windows Powershell – that was really good. Close to DOS and on my machine – no worrying that I was going to some how, magically, crash the server! (Why I thought that I have no idea). The I found a really well written tutorial on Learn Code The Hard Way.
Hallelujah!
What this tut gave me was some confidence. I did the exercises and got more comfortable with CLI and began memorizing new commands. Great!
Actually, super duper great! Having a large command vocabulary is more than desirable. This expands what one could do with CLI – obviously. CLI is like a magic pill that makes you fast! Especially if you dev in Drupal. Which I sometimes do. Drupal has DRUSH and DRUSH has everything!
Hopefully, over the next month, I’ll have achieved proficiency.